Sunday 29 November 2015

Cute Christmas craft ideas

I have had the following ideas sent to me by a friend who found them online.  I apologies in advance as I have no reference to the original creators of the following ideas but just had to share them as they are so cute for Christmas.  I cant wait to have a go at some of these with the families I work with...

1. How cute are these snowmen to personalise with photos of your children?


2. Love this idea for cute personal reindeer's to help Father Christmas pull his sleigh.


3. How sweet is this to make for the tree or to give as personal gifts for loved ones?


4. This is a beautiful hand made gift....for every occasion


Simple Christmas jigsaw puzzles

I have seen a lot of ideas for simple children's jigsaws made out of lolly sticks.  Yes you heard correctly....lolly sticks.  

Lolly sticks are really cheap to buy in the craft section of your supermarket or craft shops and have many uses.  You may already have some in your craft stash if you have one.

We decided (little helper and I) to have a go at making a really simple set of three jigsaws with a Christmas theme.  Excuse the quality of the photos but we were having fun taking them.

What you will need:


  • 3 - 5 lolly sticks depending on your design
  • Felt pens or you can use children's paints
1. Place the amount of lolly sticks needed for your design side by side length-ways.  Place them against a tub or similar prop to stop them from moving while you draw / colour your design.


2. Draw your design on the lolly sticks using your felt pens or similar.


Mix the pictures up.... singly  


Or mix all the pieces together....


You can also make these using:
  • Magazine pictures
  • Family photographs
  • Wrapping paper
The list is endless.  have fun!


Sunday 22 November 2015

Christmas is coming...... Here's a lovely personalised family decoration thats easy to make and cheap too!

Well the shops are stocked with lots of lovely Christmas treats and decorations and the big day will soon be here.  However Christmas doesn't have to be an expensive time as there are lots of ideas around for decorations that can be made very cheaply or by using things from around the home.

While I set myself the challenge of making the sensory / coloured hand print book, I came across some old pringles lids I had kept (other crisps in tubes are available).  

I made the following tonight in a very short time to show you how easy these family keepsakes are to make to hang on the tree, wreath or similar.

Children love getting involved and can help to decorate them, you can add glitter too.

These are the items I started with:


  • 3 x pringles lids (use can use as many as you need for the tree)
  • Pieces of ribbon left over from last Christmas
  • Sharp needle
  • Cotton
  • Scissors
  • Glue stick
  • Family photographs


Cut out family faces from photographs by using the pringles lid as a template.  The pictures will then fit into the lid nice and snug.  I used a glue stick to reinforce the pictures to stay in the lid.  You can also add pictures back to back so that when the decoration hangs on the tree and moves you can see a picture on both sides.


I then folded the thicker ribbon into bow shapes and used the thinner ribbon to hold them together as seen in the picture below.  I then used the needle and cotton to sew the back of the bow and make a loop to hand the decoration onto the tree.  I tacked the cotton to the back of the bow again, then left a length of cotton before threading the needle through the plastic lid a few times and knotting.


Finished product hanging on my tree...


You can add beads, buttons etc.  The possibilities are endless.  Have fun!

Home made Sensory / coloured hand print book

Today I set myself another task of using only items from around my home to make a home made sensory book to develop early language skills through play. I decided to make a hand print shaped book to personalise the sensory side.

For this book here are the materials I used to make it that I found:


  1. Coloured cardboard
  2. White cardboard
  3. Coloured pieces of scrap fabric that matched the colours of the cardboard
  4. Pen
  5. Scissors
  6. Glue stick
  7. Stapler
  8. Sellotape
  9. Piece of thin ribbon

Firstly I drew around my hand (your child's hand ideally), then I cut my hand shape out and used it as a template to cut out hand shapes from the other coloured cardboard.


Then I used one of the templates to cut out hand shapes from the different fabric scraps that I had found to match the cardboard colours.


I then glued the fabric shaped hand cut outs to each of the coloured card shaped templates, making sure that the fingers and thumb pieces matched correctly.

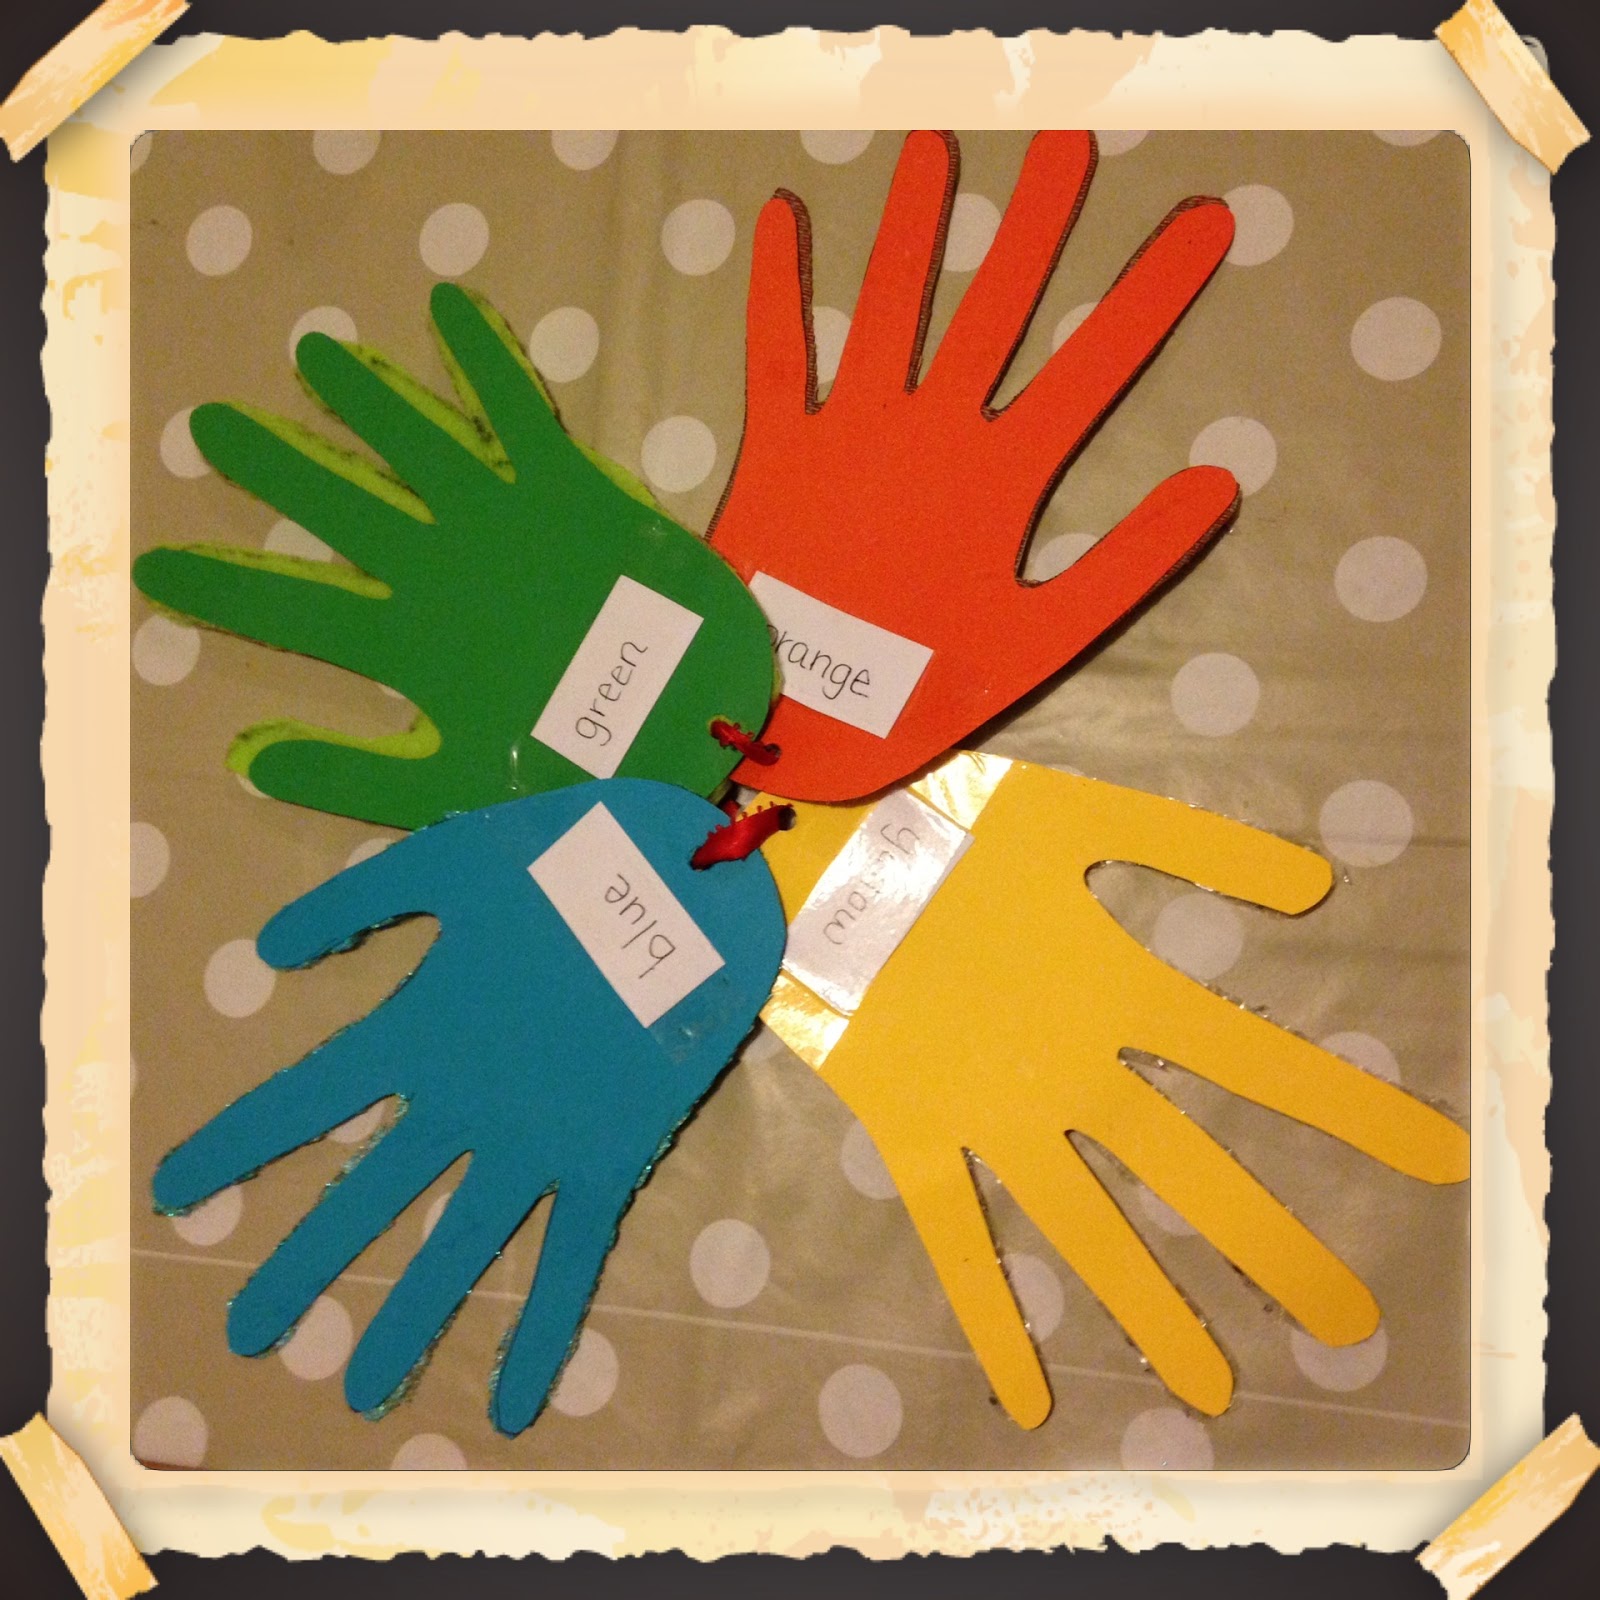
I then cut some of the white cardboard up into smaller pieces and wrote the name of each colour separately on four pieces and the sensory word for how the fabric felt separately on another four pieces of the cardboard. 

I then stapled the sensory words to the fabric covered hand and on the opposite side on the plain coloured hand added the word for each colour separately and secured with sellotape.

I then made a hole in each hand using a hole punch at the base and threaded the piece of ribbon through.

As seen here......


 Mixed sensory and coloured....


 All plain coloured.....


All textured.....


Closed up ready to explore.....

You can use old cereal boxes and paint if you have no coloured card.  There are so many different textures you can add.  How about adding some kitchen foil to make a shiny hand or cotton wool to make a soft or fluffy hand?  The possibilities are endless.  See what you can make without spending any money.  

Have fun!

Sunday 15 November 2015

Just out of curiosity.....

Today has been a very nostalgic day indeed with many happy memories flooding back from my childhood.  While chatting with my husband today about my childhood memories of spending happy times with my grandmother who sadly passed away seven years ago, i remembered a picture that she had on the wall in her back living room.

It was a picture of a little girl in a garden with a pear tree.  Very reminiscent of the Pear soap advert posters (for those of you who are older like me).

A song that was sung from this picture poster by my grandmother that was taught to me was the following...

I had a little nut tree
and nothing would it bear
but a silver nutmeg and a golden pear
the king of Spain's daughter
Came to visit me
And all because of my little nut tree 

I hadn't remembered the picture or the sung for a long time....does anyone else recall this song from their childhood?  Id love to hear.

Sarah x

Image taken from: www.fotolibra.com

Bubble painting

Children love bubbles, both playing with them and watching them float along.  You can even purchase magic bubbles these days that don't pop when you reach out to catch them.

When I was a little girl I loved nothing better than using my mums washing up liquid and adding water to make a bubble mixture.  Good old wire coat hangers were in abundance in those days and my dad made me a bubble wand out of a piece of one.  Happy memories.  

Bubble painting was another activity i loved.  The best paint I like to use for this is good old powder paint, although you can do it with ready made liquid paint too.

You will need:


  • Powder paint (or similar)
  • Washing up liquid
  • a drinking straw
  • paper
Make up the bubbly paint using the powder paint, water and washing up liquid.  Don't make it too runny or too thick.  You might need to practice the consistency.  Just a couple of drops of washing up liquid should do it.  

Add the straw to the container that you have mixed the paint in and blow into the paint to make it bubbly.  Use different colours to create your work of art.

Put a piece of paper gently on top of the bubbles.  Lift it off and look at the pattern.

Great fun : )


Image taken from: artful-kids.com

Matching and sorting.....

A great way to have fun and talk is to encourage your little one to help you sort the washing.  Matching socks together after being washed is a great way to sort into sizes, colours, patterns etc.  


Image taken from: yearningforgoodness.blogspot.com


Sorting shoes is another great one to do.  Daddy's shoes, Mummy's shoes, little shoes, big shoes, the list goes on.


Image taken from:  www.theeducatorsspinonit.com


The same can be done with gloves too.  What else can you find around the home to match?


Image taken from: www.gardenbetty.com

Make a simple snap game.  You can make an animal one, colour one, shape one, number one or how about a personal family member snap game for lots of interaction and discussion?


The pictures above were taken from: www.activityvillage.co.uk.  


You can print them out twice and glue onto cut up cereal boxes to make them sturdy or you can draw your own pictures.


Or have a go at family snap....have fun!

Talking and pretending....

Pretend play, fantastic for developing creativity, imagination as well as talking and listening skills.

Do you remember what pretend play you took part in when you were little?  Personally I loved using my hairbrush to sing with and using my sisters clips and ribbons to play hairdressers.  I can remember it well, happy memories.

It doesn't have to cost anything for pretend play, just have a look around your house and see what you can find.  Here are some ideas:


  • Den building - use old sheets, curtains. blankets and the clothes pegs to make a den.  You can use under the table or pull the sofa out.  Add cushions to make it cosy.  If its a bit dark add a torch too,  The list is endless....see what you can come up with.

image taken from: www.wikihow.com
  • Dressing up - go through your wardrobe and see what you have that the children can use as well as their toy boxes.  They love wearing your shoes, handbags, accessories etc to pretend.


Image taken from: dailyfeed.co.uk

  • Cardboard boxes -  Supermarkets / shops recycle these.  You can get some great sizes.  Did anyone watch the MacDonalds advert a couple of months ago? Children playing with nothing but empty cardboard boxes in different sizes.  What can we be.....a robot,  a spaceman, a princess in a castle etc....just a little imagination, maybe add some colouring pens etc and away you go.  You can cut out windows and doors,,,act out fairy tales or nursery rhymes.

Image taken from: nurturestore.co.uk

  • Play shop...see the previous post about empty food packaging
  • Play vets - add cuddly toys.  Cushions could be the beds.
  • Play hairdressers - add combs, brushes, clips, ribbons etc.  Add teddies and dolls as extra customers.
How to make a post office:

A great idea for pretend play when your child has visited the real one with you.

You will need:

  • An empty cereal packet
  • old envelopes and postcards (keep the junk mail that comes through your door - great for this)
  • Old stamps or sticky labels
  • Glue stick
  • Blank forms (that you can pick up from the post office when you visit to add to the play)
  • Pencils, pens, crayons etc
  • scrap paper of different sizes
  • Post office sign (you can make one by drawing it or possibly print one out)

You can play at the table or use two dining chairs turned sideways (seat in) for a counter.  Add a tray too.  

Cut a slit in the cereal packet to make a letterbox.  Write letters together, address the envelope and stick a stamp on it.  Fill in the forms.  Add some money (real or play money) to buy stamps or other items you can add.

Most of all join in the play to not only develop language skills but to make fantastic memories.


Monday 9 November 2015

Shopping together

Shopping can be a nightmare or it can be fun.  From a child's point of view what do they actually see?  When sat in a trolley they do have quite a good view normally of the items in the aisle that you can talk about together.  However have you ever thought about when they may be in a buggy?  Most of the time it's peoples legs or shopping bags that they see, which are on the same level as them....it makes you think doesn't it!

They soon get bored if they cant join in and help.  Even younger children can get involved.

What about making some picture shopping cards?

Cut out pictures from packaging from your weekly shop and take a few with you when you go shopping.  When you know your in the aisle where the item is usually kept you can make it into a game to try and spot the item and match it to the card.  This is great for early reading skills too.


Older children can make a shopping list with you.  Pick up some of the free flyers in the supermarket to do this with.  Great practice for cutting skills too.  Lots of opportunities to talk about the shopping for the household, what you need to buy, how many etc.


You can also make one up on the computer, laminate it and use it again and again with a white board marker pen.  So many learning opportunities can take place in the supermarket.

Play shop at home with food packaging. You can stuff boxes with newspaper or similar and sellotape up to make the shop more realistic or use items from the cupboards.  Use real money.  One made up shopping bag with recycled items can provide the following:
  • Role play (playing shop)
  • Language skills
  • Discover shapes (2d and 3d)
  • Use the boxes to build with
  • When they become tatty - use them to make a junk model and start again.


Best thing about it....it's free!!!!!!!!!

Sunday 1 November 2015

Oooppss...sorry forgot to add the extra activities sheet for 'I love you as big as the world'

This is the extra activities to try at home sheet that was on offer to the families taking part in the sessions with the Book start books..........


1. Create a trail of bear paw prints in different sizes for the children to follow

2. Hide big and little bears around the room or outside in the garden for children to find

3. Make some instruments out of empty recycled bottles with sand, pebbles, water etc to make high, low, squishy and gluggy noises.

Simple home made snap game


This simple snap game was made as a simple quick activity that families could make together easily and cheaply but also that would provide hours of fun....

You will need:


  • Cardboard
  • Paint (unless coloured card is used)
  • Glue
  • scissors
  • Glitter
  • Sellotape or laminator to make the cards robust
The idea it to either use a simple snap game, as a simple matching game with sizes or to sequence in order of smallest to biggest or biggest to smallest.


I love you as big as the world final activities

World and star mobile 

A simple mobile was made as en extra activity to link to the book for the children to hang in their rooms. 

You will need: 


  • Cardboard
  • Yellow card
  • glue
  • glitter
  • ribbon
  • lolly sticks
  • world template
  • crayons


I love you as big as the world part 4

Were going on a bear hunt:


I am lucky enough in work to have the story sack of this book which is inclusive of wooden characters from the story which the children love to play with.  However one of the things I always like to do with this story is to make all the families physically go on a bear hunt......the next time you read this story try it  : )


I also love the resources you can find on www.sparklebox.co.uk to support this story such as these printable cards.


These Were going on a bear hunt discovery bottles are a great way to add to the story too which I found on http://www.homeschoolcreations.net/2013/09/packing-peanut-sculptures-and-discovery-bottles/